iDogCam Cloud Install Information
Explore the iDogCam systems tailored for your pet care business.

First things first; DON’T BE AFRAID TO CALL 424-229-2146 Ext. 0 with any question! We would rather have multiple 5 – 10 minute calls, than an extended trouble shooting session.
Setting up the Cloud System
 |
 |
|
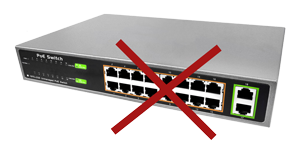
When connecting to the server or router use the uplink ports, not the standard POE ports. |
|

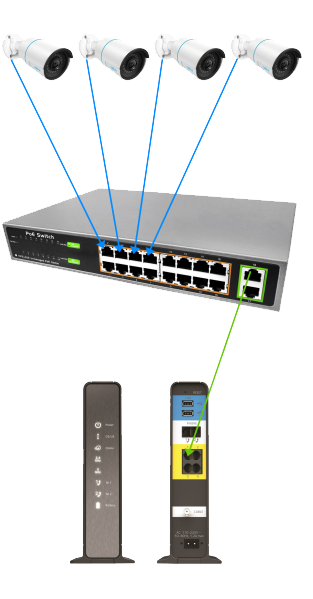 |
The cameras will connect to the PoE (Power over Ethernet) switch via the network cables. They will plug into the orange outlined section of the switch. (Illustrated by the Blue lines) It will be incredibly helpful in the future if you label the cables; or create a list that says camera “x” is plugged into port “x” on the switch. Ideally you would want camera 1 into port 1, camera 2 into port 2, etc…, but this is not always possible so please notate for any future trouble shooting needs. |
The PoE switch will connect to the ISP (Internet Service Provider) router via a network cable. The connection will be made from the green outlined area on the switch, or a port labeled “Uplink”. (Illustrated by outlined area on the switch, or a port labeled “Uplink”. (Illustrated by the Green line) The ISP router will often have 4 ports on the rear, open for physical connections. They will sometimes be highlighted in yellow. They may also be labeled as “LAN” ports. |
|
Once all hardware is connected, reach out to iDogCam support to verify that we see the system. You can call 424-229-2146 Ext. 0 to reach us. |
Installation Tips
- Call 424-229-2146 Ext. 0 if in doubt. We would rather have multiple 5 – 10 minute calls, than an extended trouble shooting session.
- Setup the PoE switch and its connection to the ISP router. Then TEST the camera before you hang it.
You can do this by plugging the camera(s) into the switch with the short blue cable that came in the box. Then call our support line, 424-229-2146 Ext. 0, for us to verify we see the camera(s). You can do this with all cameras at once. You do not have to do one at a time. This will verify the camera is good, and not damaged from transit. It will also prove that, once hung, if it does not appear within a minute or two, that you have a cable issue. This will add a little time to your install; but will save you a headache.
If you don’t test the camera before installation, and it does not appear, you have to take it down use the short the blue cable and plug it into the switch, figure which is the problem (camera or cable), fix it, then go back and hang again. The extra time to test is better than the headache of running up and down the ladder and uninstalling/reinstalling the camera. We know from experience. - Label the cables and/or the PoE switch. You can also fill in the blank form included for what camera is plugged into what port. Save the form for future trouble shooting.
- When possible, plug camera 1 into port 1 of the PoE switch, camera 2 into port 2, and so on…